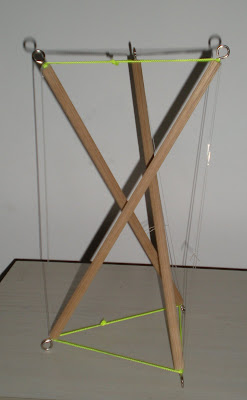
Even though photos cannot capture the dynamics of a tensegrity model, they simply help illustrating why I got hooked on tensegrity. I managed to find a shot of the very first tensegrity tower I build, using nylon string for all cords. You can see some slack triangles, but the structure proved rigid and balanced enough to hold a juggling ball.

The limited stretch of nylon produces very rigid structures, and tuning can be quite tedious. However, when the cords have good prefabricated length, these models can easily used in groups to explore its dynamics.
The tower itself looked quite different from the model shown with the instructions, the tensuls kept their shapes instead have being shaped by the different loads on the tension elements.
Without elastic cord my tower had interesting qualities, but not the aesthetic appeal and surprising dynamic I expected. I decided to construct a 4 strut tensegrity structure next, which started an amazing learning experience. I estimated the cord length by using figure from a Java applet, and prepared what I needed. I didn't have any visual instruction how to lay out and construct this model, so I just started off, triangulated around and attached cords.
I marked the dowels so I could distiguish them, and had a way to write out the needed connections. The 4 strut model has 4 triangles and two 'diagonals'. On my first attempt to attach the second diagonal, while the model popped into three dimensions, some cord slipped off and the model collapsed into a chaos of rods and strings.
It took me roughly a day to figure out decent length for the final tension cords, and how to lay out the struts to allow them to unfold. I didn't count the amount of times I assembled and disassembled the flurry of strings and dowels, and how often I repeated the same mistakes in the process. Perseverance paid out, and I had a new structure to explore. I won't take it apart too soon, though, I'm still not too confident about rebuilding it again.

I used 30 cm length (instead of 20cm) for the 4 strut model, and used the left over struts for easy task: A simple 3 strut tensul with the same cord length for the main triangles. I had some elastic cord now (still not the right thing), yet combined nylon and stretch cord for the model. The final model appear much taller than the elements of my first tower. I placed the model next to it, and noticed that by adding 50% length to the compression element I gained twice the height.

Finally I found the material suggested for these kind models: Plastic stretch cord used for beading. Well, currently I'm waiting for a delivery of enough supply for extended experimentation. I picked up a similar material in a craft shop, unfortunately with just 0.5 mm diameter. It works okay so far, although the stretch factor does not work as expected yet.
The material makes it difficult to tune the models, and fix the cords to their attachment points. I managed to get three levels together, but the stabilizing triangles permanently flattened the lowest level. I guess I'll take more time for tuning the single tensuls, and fixings the cords more to the attachment.
I fiddled for a while with more securing triangles, and ended up with some entangled cord on one strut. Instead of trying any more to stand the model up, I took two more cords and hung the model up.

Depending on the lighting, the transparent tension cords are virtually invisible, enhancing the floatiness of the model. It reminds me of the idea of being 'skyhooked'. Funny enough, you can move lower parts of the model around without affecting the 'head', but when the head moves, the body follows...

I still have a long way to go if want to skeletal structures as tensegrity models. I wouldn't mind coming across enough model to buy them. Experiencing tensegrity helped me a lot understanding the process I started with learning the Alexander Technique.
Tuning one part of a tensegrity structure affect the tension levels throughout the entire structure. When we release a habitual holding pattern, other tensors (muscles) have to become active. A tensegrity model balances by specific patterns of pretension, more overall tension yields more rigidity. Sounds familiar?
By doing less we retune the tension elements, or rather, develop new patterns of feedback with our muscle spindles. We need to change our habitual reaction to this muscle spindle feedback, inhibiting the impulse to 'hold on' and send our head forward instead. This sounds easy, but many obstacles lurk on that path.
Depending on how one has used him/herself the tensors responsible for balance have weakened. Using them can 'feel wrong', and can cause discomfort and pain. We might not be aware that changes affect more than one area, or underestimate the importance of primary control.
Seeing, building and touching the floating elements of a tensegrity structure changed my conception of my own bones from the semi-solid stack of columns to mere floating compression elements. And I hope it will help my future student's understanding.

No comments:
Post a Comment